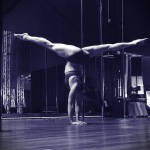
 Pressing up into a handstand (through a straddle) is a movement that took time to learn and acquaint myself with. And I mean TIME! I had to be very patient and find stepping stones along the way: being spotted, using a pole or a wall for balance, and just generally practicing, practicing, practicing. And if I don’t practice regularly (at least several times a week, and preferably every day), I lose it all over again. The benefits of doing handstands are multiple, from core strength to upper body and shoulder stabilization to the increased blood flow to your brain and throughout your body, not to mention other awesome benefits like spinal decompression, improvements in digestion, balance and co-ordination and stress relief. Read: great posture, excellent health, big SMILE (from inside, out)! Handstands are great for conditioning and mobility, but they are also part of a language of dance in themselves. And as a dancer, being able to balance on your hands and/ or forearms opens the doors to many new ways of moving over the floor, and of transitioning between the floor and the pole. Here are a few handstands I popped out this morning after Strength class and the Wod at Crossfit Max Effort here in Las Vegas (scroll down to see). If you’d like to try some for yourself, here are some pointers:
* For beginners, start under the guidance of an experienced instructor. They can come from a variety of disciplines, including gymnastics, acrobatics, yoga, circus arts, or dance, such as pole dancing or pole fitness. Each discipline brings its own unique perspective to the art of hand balancing. The fun is in taking it all in, putting the pieces of the puzzle together and finding what works for you!
* Start with small steps and build on each one. Downward dog, forearm stand, wall walks and handstanding against the wall will all help build the elements you need for a full handstand. Again, work with an experienced instructor for spotting and to receive the feedback that’s specific to your body.
* Remember one of the major benefits of handstanding: the smile you get from the fun of turning your world upside down! Learning & practicing may involve discipline and sweat, but keep an element of playfulness in everything you do.
* Keep your hands underneath your shoulders and your middle fingers parallel. This ensures correct alignment not only for your wrists but for the muscles that will be supporting you in the handstand. Use your fingers to “claw” or “grab” the floor. Your fingers are an integral part of your balance in this position. Using them properly will also take some of the pressure out of your wrists.
* Learn to breathe upside down! Once you invert, breathing changes. Whilst your diaphragm will feel constricted, you still need to maintain oxygen levels in your brain and body. Breathe through your nose, take a breath just before you go upside down, and continue to breathe in the handstand (although breathing is likely to be somewhat shallower).
* I prefer to spot just in front of my hands (although this is not the only way). For a straighter handstand, spot closer to your hands; if you’re looking for a deliberately arched position, spot out in front (beyond your fingers).
* To learn the press, work with a spotter/ instructor or against a wall. Start from a basic handstand, take your legs into a straddle, and control the descent as best you can (bent legs make it easier, especially if you are lacking the flexibility required to take your legs far out to the sides). Work this movement until you can control 100% of the descent, landing your feet softly on the floor. Once you have this, then try the reverse, finding the point of balance where your feet are lifted lightly off the floor – and keep lifting.
Happy Handstanding!
For more information about my classes and workshops, including Skype online lessons, please see my Classes page. Make sure you follow me on Instagram and Facebook for daily training, touring and performance updates.


